今回は、Toonシェーダーを実装します。
Toonシェーダーは、3Dモデルをアニメ調に見せるためのシェーダーです。
アニメや漫画が原作のゲームでよく使われています。
以下、実装
 //グローバル変数宣言
 float4x4 world;
 float4x4 view;
 float4x4 projection;
 float3 light = float3( 10.0f, 10.0f, 10.0f ); // ライトの位置

 sampler2D diffuseTexture = sampler_state {
 	MinFilter = Point;
 	MagFilter = Point;
 	WrapS = ClampToEdge;
 	WrapT = ClampToEdge;
 };

 sampler2D specualrTexture = sampler_state {
 	MinFilter = Point;
 	MagFilter = Point;
 	WrapS = ClampToEdge;
 	WrapT = ClampToEdge;
 };

 //入力頂点構造体
 struct VS_INPUT
 {
 	float4 position : POSITION; //頂点座標
 	float3 normal   : NORMAL;	//法線ベクトル
 	float4 color	: COLOR00;	//色
 };

 //出力頂点構造体
 struct VS_OUTPUT
 {
 	float4 position  : POSITION;  //頂点座標
 	float3 normal	 : TEXCOORD1; //法線ベクトル
 	float4 color	 : COLOR0;	  //色
 	float3 light	 : TEXCOORD0; //ライトベクトル
 	float3 view		 : TEXCOORD2; //ビューベクトル
 	float3 halfAngle : TEXCOORD3; //二等分ベクトル
 };

 //頂点シェーダー
 VS_OUTPUT vs_main(
 	VS_INPUT input,
 	uniform float4x4 world,
 	uniform float4x4 view,
 	uniform float4x4 projection,
 	uniform float3 light
 )
 {
 	VS_OUTPUT output;

 	//モデルビュー行列
 	float4x4 WV = mul( world, view );

 	//法線ベクトルの座標変換
 	output.normal = mul(input.normal,(float3x3)WV);

 	//モデルビュー透視変換行列
 	float4x4 WVP = mul( WV, projection );

 	//頂点座標の座標変換
 	output.position = mul(input.position,WVP);

 	//色の設定
 	output.color = input.color;

 	//視点座標系の頂点座標を求める
 	float3 PosEye = mul( input.position, WV );
 	//視点座標系のライト座標を求める
 	float3 LightPosEye = mul( light, (float3x3)view );

 	//ライト方向のベクトル
 	float3 L = normalize( LightPosEye - PosEye );
 	output.light =L;

 	//視点方向のベクトル
 	float3 V = normalize(-PosEye);
 	output.view = V;

 	//二等分ベクトル
 	float3 H = normalize( L+V );
 	output.halfAngle = H;

 	//ビューベクトルの設定
 	output.view = V;

 	return output;
 }

 //ライトカラー
 float4 Ambient = float4( 1.0f, 1.0f, 1.0f, 1.0f );
 float4 Diffuse = float4( 1.0f, 1.0f, 1.0f, 1.0f );
 float4 Specular = float4( 1.0f, 1.0f, 1.0f, 1.0f );
 //マテリアルカラー
 float4 Ka = float4( 0.2f, 0.2f, 0.2f, 1.0f );
 float4 Kd = float4( 0.6f, 0.6f, 0.6f, 1.0f );
 float4 Ks = float4( 1.0f, 1.0f, 1.0f, 1.0f );
 float power = 90.0f;

 //入力ピクセル構造体
 struct PS_INPUT
 {
 	float4 color	: COLOR0; //色
 	float3 normal	: TEXCOORD1; //法線
 	float3 light	: TEXCOORD0; //ライトベクトル
 	float3 view		 : TEXCOORD2; //ビューベクトル
 	float3 halfAngle : TEXCOORD3; //二等分ベクトル
 };

 //ピクセルシェーダー
 float4 ps_main(
 	PS_INPUT input,
 	uniform float4 Ambient,
 	uniform float4 Diffuse,
 	uniform float4 Specular,
 	uniform float4 Ka,
 	uniform float4 Kd,
 	uniform float4 Ks,
 	uniform float power,
 	uniform sampler2D diff,
 	uniform sampler2D spec
 ) : COLOR0
 {
 	//ライトベクトルの正規化
 	float3 L = normalize( input.light );
 	//法線の正規化
 	float3 N = normalize( input.normal );
 	//ビューベクトルの正規化
 	float3 V = normalize( input.view );
 	//二等分べkとるの正規化
 	float3 H = normalize( input.halfAngle );

 	//ディフーズ
 	float diffuse = max( dot( L, N ), 0 );
 	//スペキュラ
 	float specular = pow( max( dot( N, H ), 0 ), power );

 	//環境光
 	float4 totalAmbient = Ambient * Ka * input.color;
 	//拡散反射光
 	float4 totalDiffuse = tex2D( diff, float2( diffuse, 0 ) );
 	//鏡面反射光
 	float4 totalSpecular = tex2D( spec, float2( specular, 0 ) );

 	return totalAmbient + totalDiffuse + totalSpecular;
 }

 //テクニックの指定
 technique toon
 {
 	//パスの指定
 	pass Pass_0
 	{
 		CullFaceEnable = true;
 		CullFace = Back;
 		DepthTestEnable = true; //デプステストを有効
 		VertexProgram = compile arbvp1 vs_main( world, view, projection, light );
 		FragmentProgram = compile arbfp1 ps_main( Ambient, Diffuse, Specular, Ka, Kd, Ks, power, diffuseTexture, specualrTexture );
 	}
 }
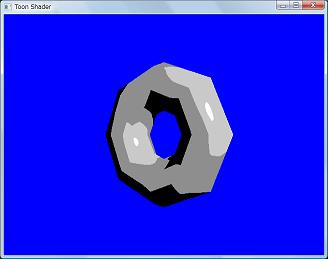
実行結果
今回は、テクスチャを使用しているので、C++のプログラムの変更が必要になります。
変更点は、
以下の変数の追加
//パラメータ 拡散反射用テクスチャ
CGparameter diff = NULL;
//パラメータ 鏡面反射用テクスチャ
CGparameter spec = NULL;
//Diffuseテクスチャ
unsigned int diffuse;
//Specularテクスチャ
unsigned int specular;
以下の、プログラムの追加
//初期化部分で追加してください
//テクスチャの読み込み
TGATexture::load( 0, "DiffuseTexture.tga" );
TGATexture::load( 1, "SpecularTexture.tga" );
//IDの取得
diffuse = TGATexture::getID( 0 );
specular = TGATexture::getID( 1 );
//パラメータの取得
diff = cgGetNamedEffectParameter( effect, "diffuseTexture" );
spec = cgGetNamedEffectParameter( effect, "specualrTexture" );
//パラメータの設定
cgGLSetupSampler( diff, diffuse );
cgGLSetupSampler( spec, specular );
今回は、ここまで。
最終更新:2009年01月31日 23:12


 toon補助用.zip